How Kubernetes Runs Containers : A Practical Deep Dive
Introduction
One might ask, with all the advancements in container orchestration, why even bother looking under the hood? Well, depending on whether you're running a managed or self-managed cluster, the answer could vary — sometimes it matters a lot. Beyond that, understanding how Kubernetes actually works under the hood is crucial when you're managing clusters at scale. It helps with troubleshooting, performance tuning, and designing more resilient systems.
And last but not least, it's just fun!
A Dumb Container Orchestration Model
First of all, let us take a look at how a very primitive container orchestration system might work. This will give us an idea of how everything fit together.
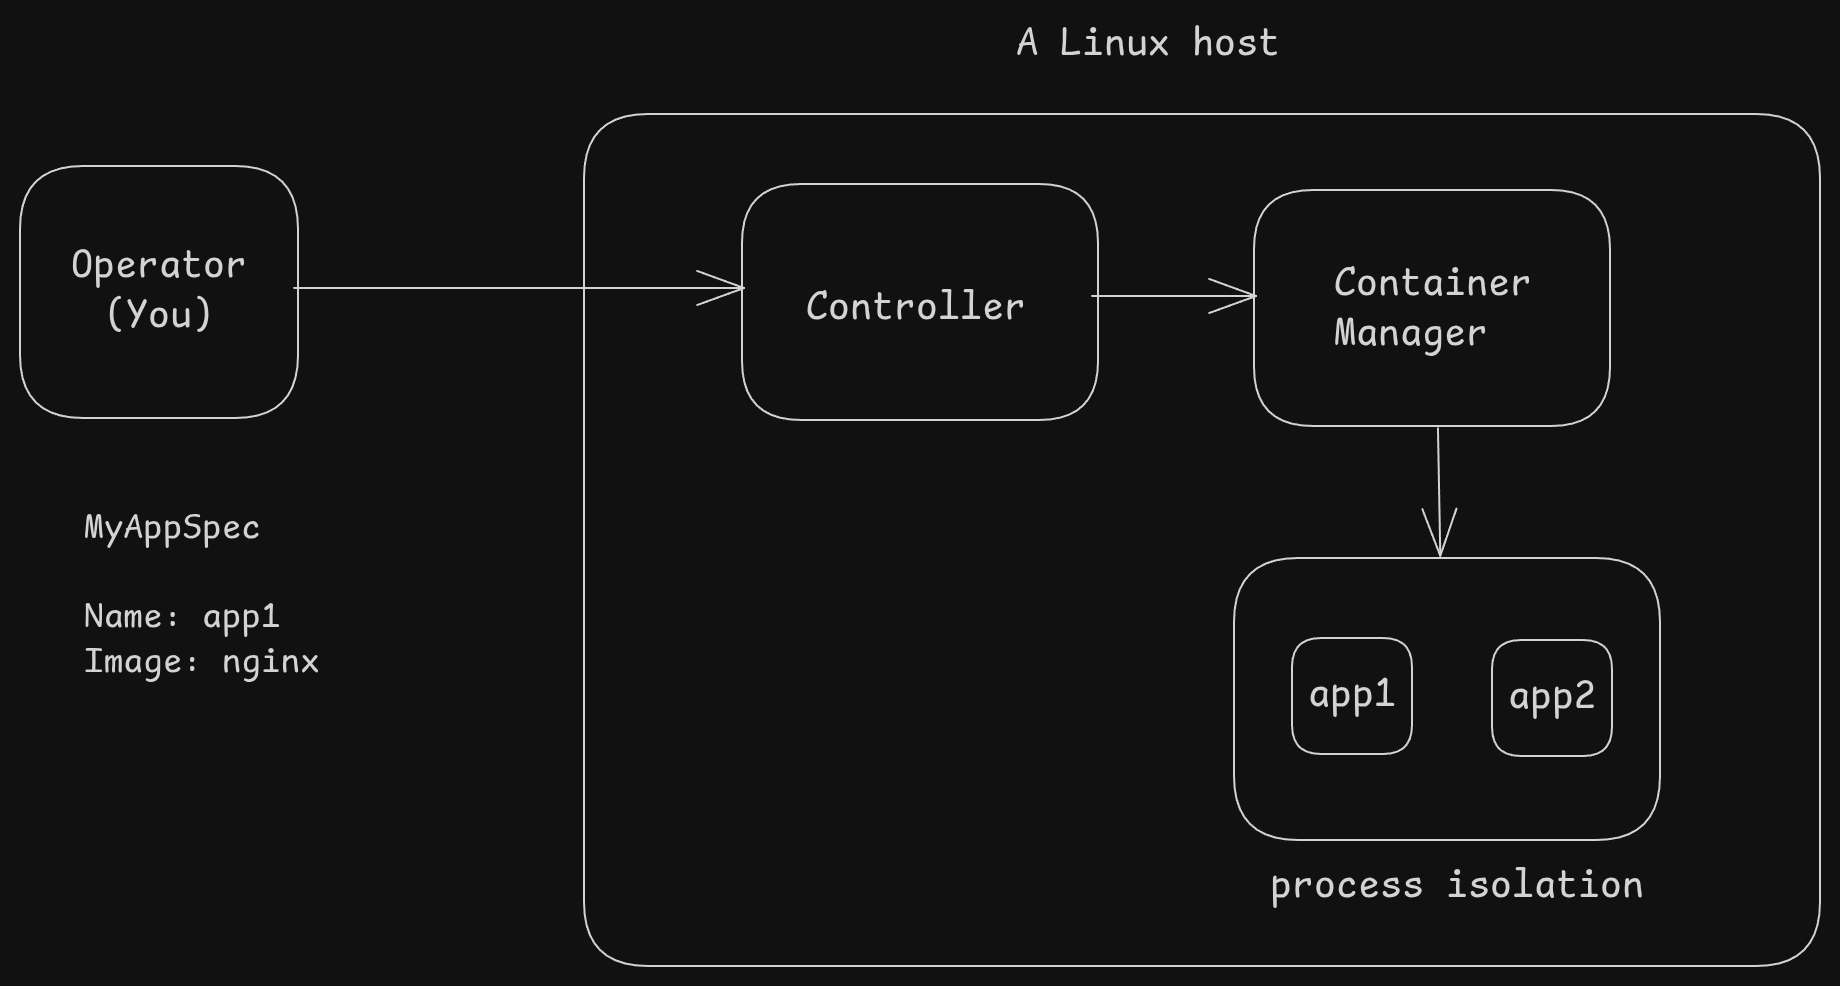
We have a single Linux machine (no clustering, sorry)
- An operator (that is you), defines a simple spec (maybe a text file? a yaml file maybe?)
- This defines what you want to run. Here, we run an app called
nginx
- This defines what you want to run. Here, we run an app called
- A service (or controller) exposes an API where the user (you) can send this spec — either using a tool or making an API call.
- It then translates that request into something the container manager (example Docker) understands
- The container manager (docker /containerd) will then use Linux's features (for isolation and resource limits) to run these applications as Linux processes
Of course, this is a really dumbed-down view – it’s only meant to give you a rough idea of how container orchestration might work. A real-world production-grade orchestrator like Kubernetes is a lot more complex — but not because the core idea is different,
just because Kubernetes needs to handle a lot more things: clustering, networking, scheduling, health checks, scaling, and more.
Maybe take a look at the Kubernetes architecture to compare the mental model
Quick refresher - How Linux Runs Processes
Before we dive into Kubernetes, let's take a quick look at how Linux itself runs processes. At the end of the day, a container is just a Linux process(s) under the hood.
When you start a program on Linux, the OS creates a process. This process has a unique ID called PID (Process ID). Each process has its own memory, file descriptors, etc.
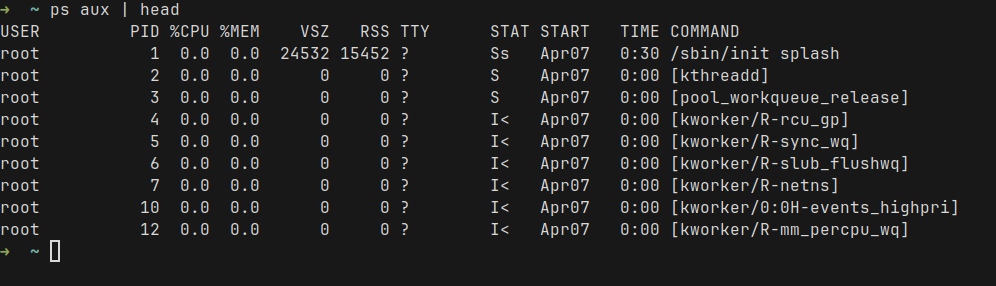
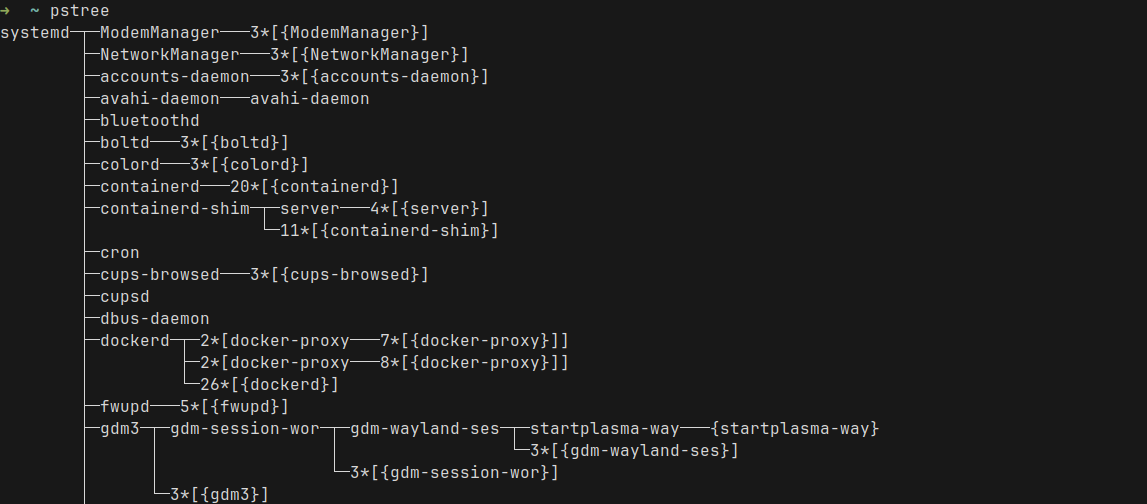
Linux organizes these processes into a tree where each process has a parent – except the very first one (called init or systemd). For example, this is how the tree looks like, using the pstree command
Isolating different processes (Namespaces and cgroups)
By default, processes share resources such as file systems, network interfaces, etc. But we need some way to isolate them. But why?
Without isolation, processes can see and interfere with each other. A misbehaving or compromised app process could inspect other processes, access shared files, or disrupt the network. Additionally, we don't want one bad process to starve others of precious resources such as CPU, memory, disk, or network.
For this, Linux uses two major features:
- Namespaces: These isolate what a process can see — network interfaces, mounted filesystems, process IDs, etc.
- cgroups (control groups): These control how much CPU, memory, or I/O a group of processes can use.
Together, namespaces and cgroups let us sandbox processes in a lightweight way — in contrast to running a full virtual machine for each application.
Deep Dive into Kubernetes internals
Alright, now that we have refreshed our memory on how Linux processes work, let's take a look at Kubernetes. For this exercise, I want to run a Kubernetes cluster, deploy a pod, and take a look at how it runs as processes.
I will use k3s to create a cluster on a Linux VM.
Installing Kubernetes (k3s)
Installing k3s is fairly easy. Follow the quick start guide
curl -sfL https://get.k3s.io | sh -Let's look around – What's running after k3s install
Run ps and grep for the k3s related process names
ps aux | grep -E 'k3s|containerd|etcd|flannel|kube'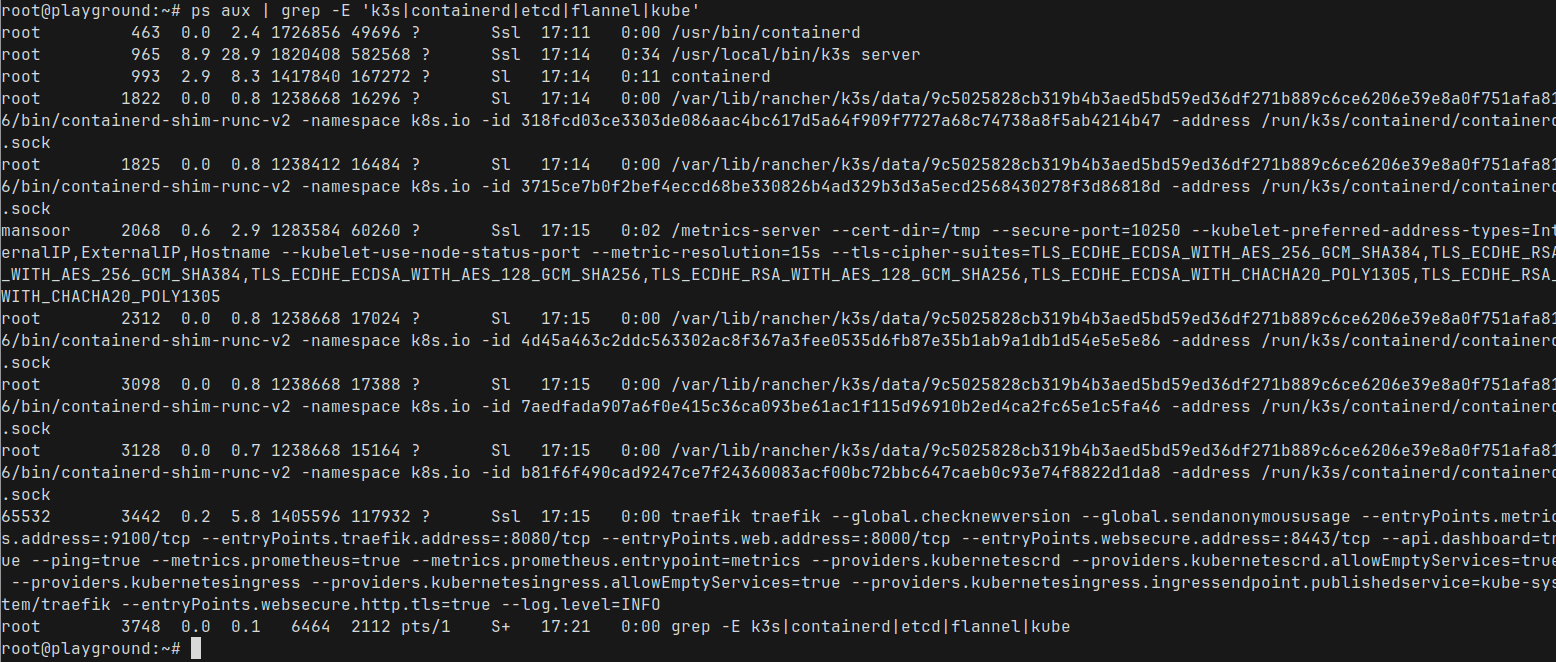
That's a lot of processes. But we don't need to worry about them all. Only few are important in this context
- k3s server : This is a lightweight Kubernetes server that bundles a few components together
- It combines the API server, kube-proxy, kubelet, scheduler, and a bunch of other services.
- You can read more about the architecture in the k3s documentation.
- This also contains an embedded etcd server as the database
- containerd : This is the container runtime which is actually responsible for managing containers
We can ignore the rest for now
Let's take a look at the current namespaces
namespace here means the Linux namespace and is different from the Kubernetes namespaceWe can use the command lsns to list the current namespaces
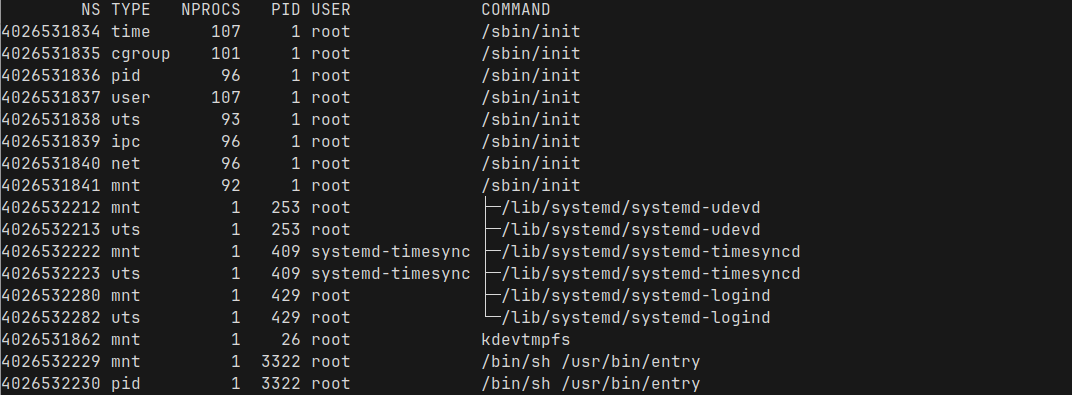
At this point, most of these namespaces are system-wide, created by init when the machine is booted. We can see what type of namespace each one is - pid, network, mount, etc.
Let's take a look at cgroups
We can see the current cgroups at /sys/fs/cgroup

This won't make much sense right now, but I promise we will come back to it soon!
Deploying a simple pod
Now that we have seen what's running on the system, let's deploy a simple pod. We will use Nginx for this example. I will create the pod.yaml
apiVersion: v1
kind: Pod
metadata:
  name: nginx
spec:
  containers:
  - name: nginx
    image: nginx:stable-alpine
    ports:
    - containerPort: 80
And create it using kubectl apply -f pod.yaml
And our pod is running under the default Kubernetes namespace
root@playground:~# kubectl get pod
NAME    READY   STATUS    RESTARTS   AGE
nginx   1/1     Running   0          6s
root@playground:~#
We can get some details about our new pod using kubectl describe pod nginx
root@playground:~# kubectl describe pod nginx
Name:             nginx
Namespace:        default
Node:             playground/192.168.61.101
Status:           Running
IP:               10.42.0.9
Containers:
  nginx:
    Container ID:   containerd://1da4ef4758e3404c6be5d7222115c64d7007cec7c67b8c0fb84ba391bf347c38
    Image:          nginx:stable-alpine
    Port:           80/TCP
Host Port: 0/TCP- We can see few important things such as the IP, Container ID etc
Looking at pstree
Now that we have our pod running, let us run pstree to see all the processes in our Node where k3s is running
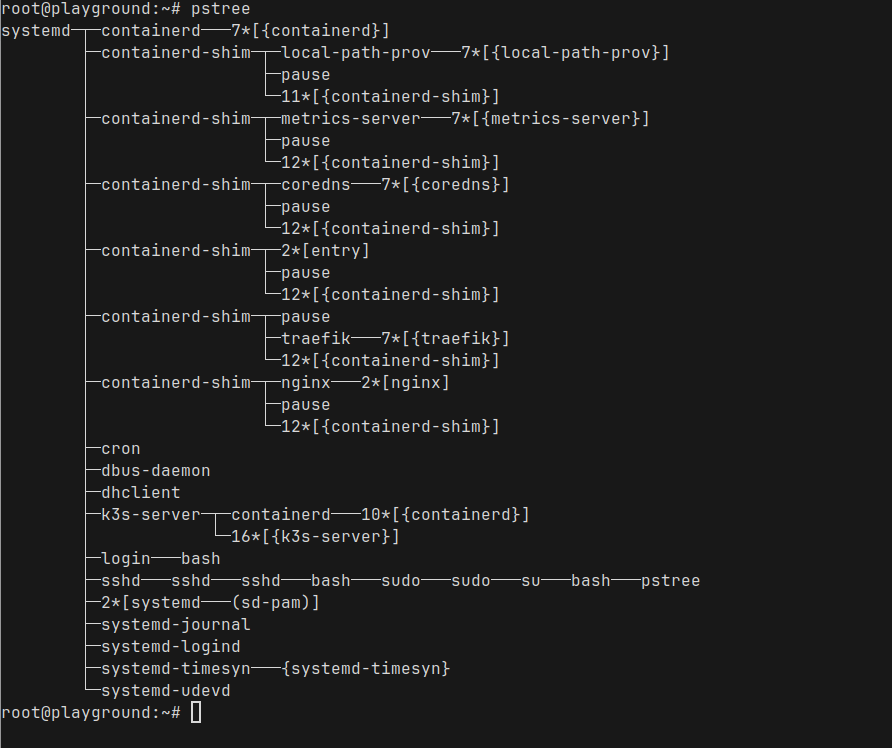
You can already see the nginx process running under the containerd-shim process
- containerd-shim is a small helper process that manages the lifecycle of a container.
- Under each shim, you’ll see the actual application process — in this case, the nginx master and its worker processes.
- You’ll also notice a pause process alongside nginx. This is a special container started by Kubernetes to manage the pod’s network namespace. Every pod has one pause container acting as the “parent” for networking.
Let's look at the running containers
Since k3s uses containerd to run the containers, We can use crictl to look at the running containers (similar to docker ps)

Here we can see a bunch of containers that comes with k3s, and we also see our nginx container at the top. Perfect! Nginx is running with container id fdb8e461f5ce0
We can run crictl inspect fdb8e461f5ce0 to see a very detailed view of the container. It is way too much information, so I am not going to show the full output
Let's find the linux process ID of our container
root@playground:~# crictl inspect fdb8e461f5ce0 | grep pid
            "pid": 1
    "pid": 5896,
            "type": "pid"
root@playground:~#
The process id is 5896, which we can actually see directly as well
root@playground:~# ps aux|grep 5896
root         253  0.0  0.2  26380  5896 ?        Ss   17:11   0:00 /lib/systemd/systemd-udevd
root        5896  0.0  0.2   9516  5472 ?        Ss   17:59   0:00 nginx: master process nginx -g daemon off;
root        6383  0.0  0.1   6332  2068 pts/1    S+   18:09   0:00 grep 5896
root@playground:~#
Inspecting Namespaces of Nginx container
We can bring lsns back again, this time we pass the process ID and see all the namespaces for the Nginx process
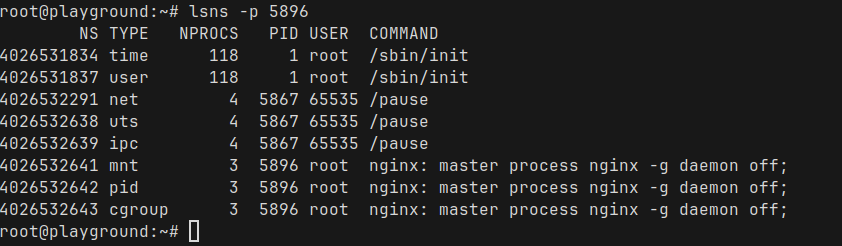
There are some really interesting observations here
- Network, UTS (host and domain name), IPC namespaces are created at the pod level
- These namespaces are owned by the pause container — the small helper container that Kubernetes starts for every pod.
- This is very important – It’s why multiple containers inside a single pod share the same network stack, hostname, and IPC space.
exec into a pod, you’ll find that all containers share the same process space, network interfaces, and domain names.They look like they’re inside the same machine — because, namespace-wise, they actually are.
Inspecting the cgroups of the Nginx container
So, as we talked about before, cgroups are how Linux manages resource usage like CPU, memory and I/O for groups of processes.
Since we know the PID of the Nginx master process, let us take a look at the cgroup assigments
root@playground:~# cat /proc/5896/cgroup
0::/kubepods.slice/kubepods-besteffort.slice/kubepods-besteffort-pod6584cbdb_8529_4e28_8418_511e9056869e.slice/cri-containerd-fdb8e461f5ce08656bc92d114a76326a38b7f79c869c0ebf38e82e52d106254a.scope
root@playground:~#/kubepods.slice/- The Kubernetes pods are grouped under thekubepodsslice/kubepods-besteffort.slice/— This pod belongs to the besteffort quality-of-service class./kubepods-besteffort-pod6584cbdb_8529_4e28_8418_511e9056869e.slice/— This specific pod’s cgroup, identified by its Pod UID (underscores_replace dashes-)./cri-containerd-<container-id>.scope— The actual container process inside the pod, managed by containerd.
We can even take a look at the current usage directly. For example, the memory usage
root@playground:~# cat /sys/fs/cgroup/kubepods.slice/kubepods-besteffort.slice/kubepods-besteffort-pod6584cbdb_8529_4e28_8418_511e9056869e.slice/cri-containerd-fdb8e461f5ce08656bc92d114a76326a38b7f79c869c0ebf38e82e52d106254a.scope/memory.current
3158016
root@playground:~#
Let's add some resource limits
Now, let us add some CPU / memory requests and limits. Modify the pod yaml
apiVersion: v1
kind: Pod
metadata:
  name: nginx
spec:
  containers:
  - name: nginx
    image: nginx:stable-alpine
    resources:
      requests:
        memory: "64Mi"
        cpu: "50m"
      limits:
        memory: "128Mi"
        cpu: "100m"
    ports:
- containerPort: 80Let's find the process ID again as we did before
root@playground:~# crictl inspect c32fcc962d2bd | grep pid
            "pid": 1
    "pid": 7398,
            "type": "pid"
root@playground:~#
Checking cgroup after CPU and Memory resource update
If take a look at the cgroup directory again
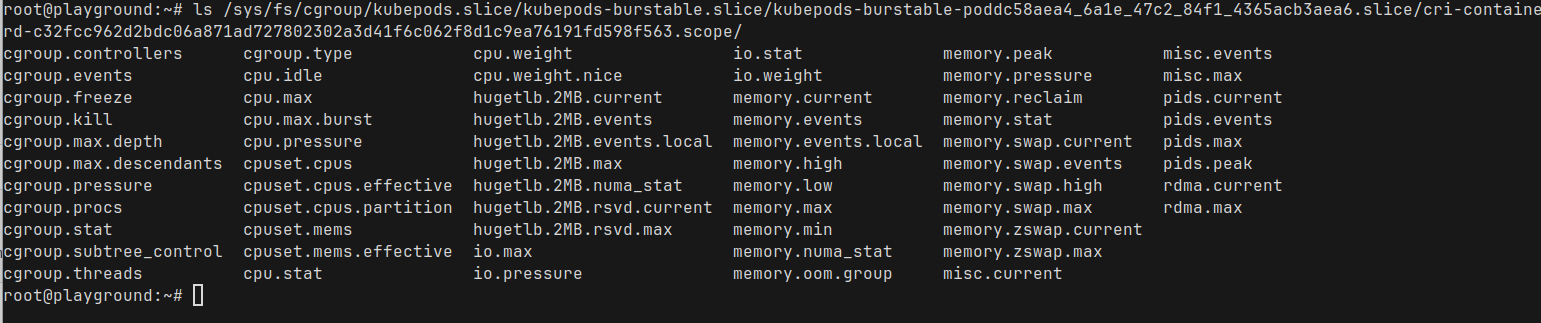
there are a ton of stuff in there. Let us take a look at the cpu.max and cpu.stats
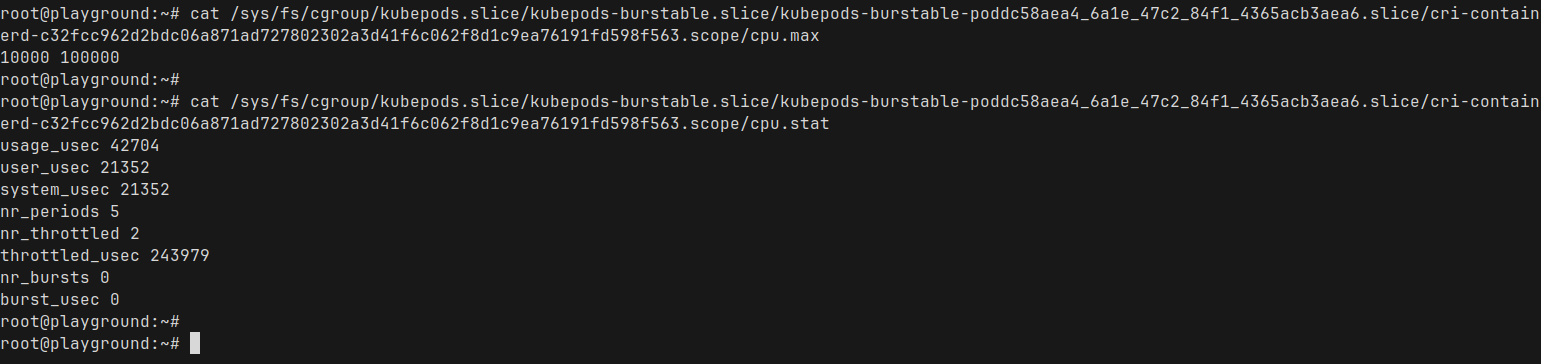
cpu.max: The first number is the quota, second is the period- it says 10,000 100,000
- Quota : 10,000 microseconds (10ms) : Nginx is allowed to run 10ms
- Period : 100,000 microseconds (100ms) : the total window for measuring CPU time.
A full CPU core (1000m in Kubernetes terminology) represents 100% of CPU time.
Since we set a limit of 100m for our Nginx pod, Kubernetes translates that into 10% of a single CPU core — which matches exactly what we are seeing in the cpu.max file
cpu.stats: This is showing the current CPU stats for that container- Most of the metrics are self explanatory here
- throttled_usec 243979 : Microseconds the container was CPU throttled (0.24 seconds)
Bonus : Entering the namespace of Nginx container
When we do kubectl exec into a pod, we are entering the namespace of that container (by default kubectl exec defaults into the first container – you can specify which container you want to exec into using -c container_name)
Similarly, we can actually enter the Linux namespace for the container and take a look around and see the things from the perspective of the container process itself
Let's find the process ID again and enter that namespace using nsenter
nsenter -t <pid> -a /bin/shThis should give us a shell inside the namespace. Let's take a look around
Listing processes
/ # ps aux
PID   USER     TIME  COMMAND
    1 root      0:00 nginx: master process nginx -g daemon off;
   30 nginx     0:00 nginx: worker process
   31 nginx     0:00 nginx: worker process
   33 root      0:00 /bin/sh
   38 root      0:00 ps aux
/ #- The nginx master process is PID 1 inside the container.
- We only see a few processes: nginx, the shell we just entered, and the
ps auxwe just ran. - No host processes are visible — full process isolation thanks to the PID namespace!
ip and hostname
/ # ip a
1: lo: <LOOPBACK,UP,LOWER_UP> mtu 65536 qdisc noqueue state UNKNOWN qlen 1000
    link/loopback 00:00:00:00:00:00 brd 00:00:00:00:00:00
    inet 127.0.0.1/8 scope host lo
       valid_lft forever preferred_lft forever
    inet6 ::1/128 scope host
       valid_lft forever preferred_lft forever
2: eth0@if15: <BROADCAST,MULTICAST,UP,LOWER_UP,M-DOWN> mtu 1450 qdisc noqueue state UP qlen 1000
    link/ether 4e:df:af:b2:e1:ff brd ff:ff:ff:ff:ff:ff
    inet 10.42.0.11/24 brd 10.42.0.255 scope global eth0
       valid_lft forever preferred_lft forever
    inet6 fe80::4cdf:afff:feb2:e1ff/64 scope link
       valid_lft forever preferred_lft forever
/ #
/ #
/ # hostname
nginx
/ #
Again, we see the isolated network namespace for the container with its own IP addresses and the hostname! How cool is that?
Wrapping up!
So, in this post, we took a bit of a deep dive into what actually happens when Kubernetes runs a pod. We’ve seen that at the end of the day, containers are just processes — with cgroups and namespaces applied for isolation and control.
Kubernetes might feel like magic sometimes, but it’s really built on solid Linux fundamentals. And understanding these fundamentals helps us scale and troubleshoot better and faster
Anyway, I had a ton of fun sneaking around in the terminal looking at all this stuff.
I hope this was at least a little bit helpful for you too! Thanks for reading. Leave a comment if you found this helpful
Member discussion